Driver Verifier Detected Violation Loop | Explained
Computing is like a double-edged sword. On one hand, it can offer you an oasis of convenience, but on the other, even a minor hiccup can lead you into the desert of digital despair. And one such hiccup is the blue screen of death saying: “Driver Verifier Detected Violation Loop”.
Frustrated and Confused? Well, you’re not alone. If a driver behaves suspiciously or is incompatible with your version of Windows, the Driver Verifier utility flags it, leading to the violation.
But fear not, as in this article, we’ll unravel the mystery of this loop, explaining what it is, why it happens, how to fix it, and most importantly, how to prevent it from happening again. So, let’s get started and put an end to this common BSOD error.

What is the “Driver Verifier Detected Violation”?
To understand the Driver Verifier Detected Violation, we need to grasp the role of device drivers in your computer’s operation. Device drivers are software programs that allow your hardware components (like your graphics card, keyboard, or printer) to communicate with your operating system. They are essential for the smooth functioning of your computer.
The Driver Verifier is a built-in tool in Windows designed to monitor device drivers for errors. When it detects a violation, it triggers the infamous loop. This violation typically occurs when a driver accesses memory improperly, creating a conflict.
The Root Causes
Behind this grand-sounding title are often some fundamental issues:
- Outdated Drivers: Just as milk spoils over time, drivers can become outdated. And instead of a foul smell, computers express their displeasure with errors.
- Incompatible Software: Sometimes, it’s not about how old the driver is, but more about how well it gets along with other software. No one likes a playground fight, especially not your PC.
- Corrupt Files: Occasionally, critical system files can become corrupted. It’s like having a corrupted file in the ‘Matrix’. The results? Not pleasant.
How it Affects Windows Operations
If you’ve faced this violation, you’d know it’s not a subtle, behind-the-scenes issue. Your PC might:
- Reboot Repeatedly: Groundhog Day, anyone? Your computer keeps restarting, giving you a never-ending sense of already seen.
- Display Blue Screens: And not the serene kinds with fluffy white clouds.
- Operate Sluggishly: Think of a sloth on a lazy Sunday afternoon. Yeah, that’s slow.
Solutions to Overcome the Loop
Facing this loop can be challenging, but fear not! Here’s a more detailed roadmap to navigate this tech maze:
Solution 1: Boot in Safe Mode
Safe Mode is a diagnostic mode in Windows that starts your computer in a limited state. Only the basic files and drivers necessary to run Windows are started, which helps isolate software or drivers causing the problem. Here are the steps to follow:
Step 1: Restart Your Computer.
Step 2: During the boot process, before the Windows logo appears, repeatedly press and hold the F8 key.
Step 3: From the Advanced Boot Options menu, use the arrow keys to select “Safe Mode” and press Enter.
Once in Safe Mode, you can uninstall problematic drivers without the loop interference.
Solution 2: Update or Reinstall Drivers
Outdated drivers can be the culprits. Keeping them updated ensures compatibility and smooth functioning. To update or reinstall the driver,
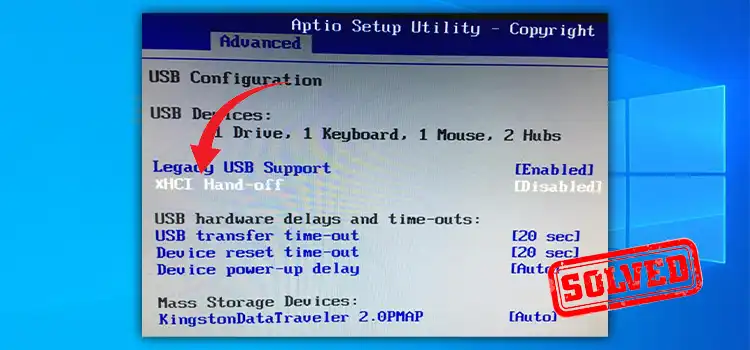
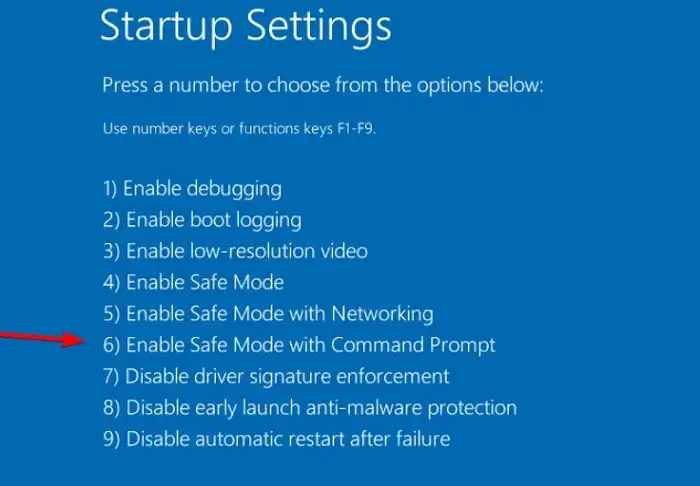
Step 1: You have to select the “Enable Safe Mode with Command Prompt” option in the first place.
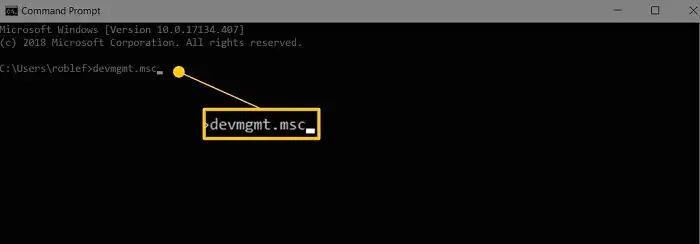
Step 2: On the command prompt, type “devmgmt.msc” to access the Device Manager.
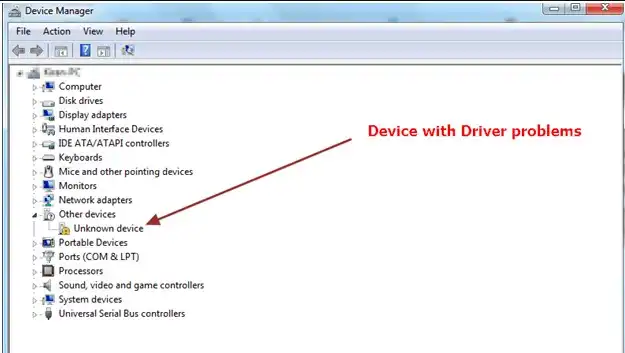
Step 3: Locate the Problematic Driver. Usually, the driver causing issues will have a yellow triangle next to it.
Step 4: Right-click on it and choose “Update driver”. Follow the on-screen instructions.
Step 5: If updating doesn’t solve the issue, right-click and choose “Uninstall device”.
Step 6: Restart your computer. Windows will attempt to reinstall the driver during startup.
Solution 3: Use System Restore
System Restore can take your computer back to a happier time when it wasn’t throwing tantrums.
Step 1: Enable the command prompt in Safe mode.
Step 2: On the command prompt, type “rstrui.exe” and hit Enter.

Step 2: In the System Properties window, click on the System Restore button and the wizard will guide you to restore your system to an earlier point.
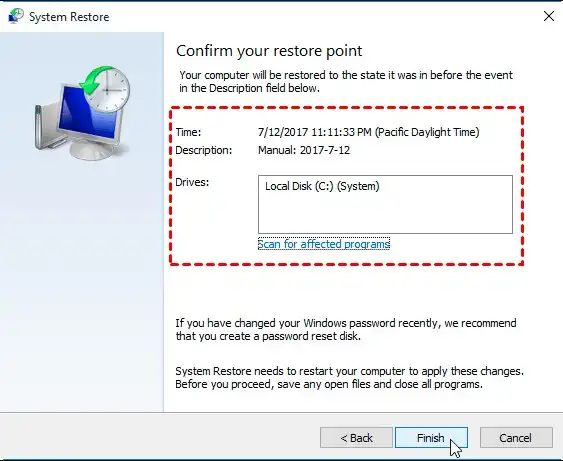
Remember, this won’t affect your personal files but will remove apps, drivers, and updates installed after the restore point was made.
Solution 4: Disable Driver Verifier
If you’ve intentionally turned on Driver Verifier (often used for testing), it might be time to turn it off. While in safe mode with the command prompt enabled,
Step 1: Type verifier /reset and press Enter.

Step 2: Restart your computer for the changes to take effect.
With these steps, your PC should be on its way to recovery. Remember, always create backups before making significant changes, so you have a safety net to fall back on!
Tips for Preventing Future Driver Violations
Prevention, as they say, is better than cure:
- Regular Updates: Keep all your drivers updated. It’s the digital equivalent of eating your veggies.
- Quality Software: Invest in good quality, compatible software. Bargains are great, but not if they end up costing you more in the long run!
- Regular Backups: Always, always back up your data. Think of it as the tech world’s safety net.
Conclusion
And there you have it – a whistle-stop tour of the “Driver Verifier Detected Violation Loop”. While it may sound like a mouthful, with a little patience and the right steps, it’s a hurdle you can easily overcome. So, the next time your PC decides to throw this curveball at you, handle it like the tech-savvy superstar you are! And if you’ve got any queries or need further insights, drop them down in the comment section. Thanks for reading, and may your computing adventures be glitch-free!
Subscribe to our newsletter
& plug into
the world of PC Hardwares