How To Remove A Graphics Card From A Prebuilt PC [Explained]
Stepping into the world of PC upgrading can be both exhilarating and a tad nerve-wracking. For many, the graphics card, with its myriad of pins, connectors, and its chunky appearance, can be particularly daunting. Yet, whether you’re upgrading to a new GPU or troubleshooting, sometimes, you just have to face the music and remove that graphics card.
At its core, removing a graphics card from a prebuilt PC is about patience, a gentle touch, and following the right steps.
So, roll up your sleeves, and let’s get started to ensure that by the end, you’ll be a GPU-removing maestro!
How Can I Remove a Graphics Card from a Prebuilt PC?
The thought of diving into a prebuilt system might be daunting. These PCs come assembled, optimized, and ready for use. But they’re not designed to lock you out of upgrades. Contrary to some beliefs, prebuilt systems are not “sealed” in terms of hardware modifications. Especially with a component as central as the GPU, manufacturers anticipate the need for potential future upgrades or replacements.
While the process might be slightly more intricate compared to custom-built rigs due to unique case designs or cable management, the fundamental principles remain the same. So, if you’re contemplating a GPU upgrade or just need to replace an old card, rest assured, your prebuilt PC won’t stand in your way!
Preparation Before Removing A Graphics Card From A Prebuilt PC
1. Powering Down
The first step in any internal PC operation is to power down the system. Ensure your PC is turned off and unplugged from the electrical outlet.
2. Tools at the Ready
While most GPU removals can be achieved tool-free, having a Phillips screwdriver on hand can be handy for removing screws holding the card in place.
3. Ground Yourself
Static electricity is the enemy of delicate PC components. Touch a metal part of the PC case to discharge any static build-up in your body before starting.
Removal Process: Step-by-Step Guide
Step 1: Open the PC Case
Every prebuilt PC is unique. Generally, you’ll find either thumb screws or Phillips head screws securing the side panel. Remove these and slide or swing the panel open.
Step 2: Locate the Graphics Card
In most prebuilt systems, the graphics card will be the large horizontal component with its own dedicated slot, often covered with cooling fans.
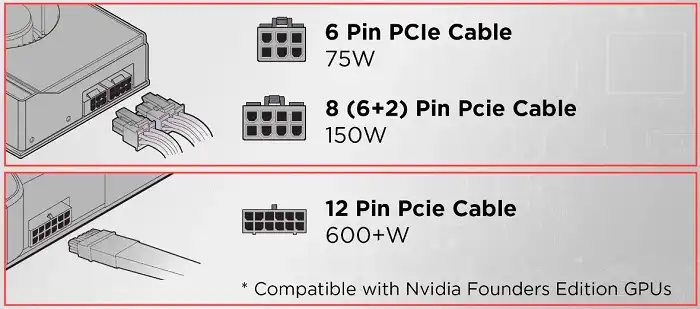
Step 3: Disconnect Power Connectors
High-end GPUs often have one or two power connectors attached. Gently press down on the clip of the connector while pulling it out.
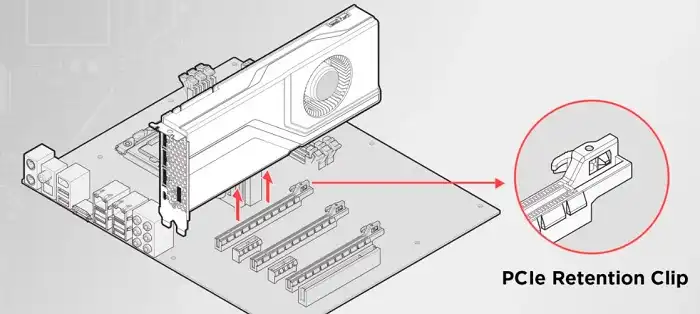
Step 4: Unscrew and Unlatch
At the back of the case, GPUs are usually held in place with one or two screws. Unscrew them. Next, press down on the PCIe slot’s latch (found at the end of the GPU slot) to unlock the card.
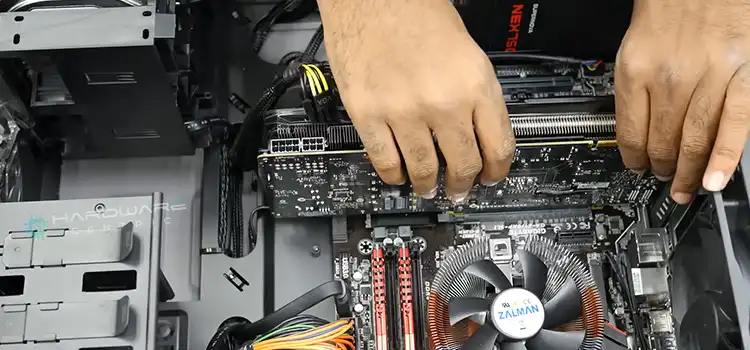
Step 5: Gentle Ejection
With everything unlocked and disconnected, gently hold the GPU by its edges and wiggle it side to side, pulling upwards until it comes free.
Post-Removal Care and Tips
- Handle with Care: Remember, GPUs are delicate. Always hold them by the edges, avoiding touching the gold connectors or any of the circuitry.
- Safe Storage: If you’re not immediately replacing the old GPU with a new one, store the old card in an anti-static bag and place it in a safe spot.
Concluding Thoughts
Graphics card removal might seem like stepping into uncharted territory, but with careful steps and patience, it’s a task anyone can master. Whether you’re gearing up for an upgrade or troubleshooting a pesky problem, remember: the world of PC DIY is all about learning, experimenting, and growing. So, here’s to many more upgrades and tech adventures!
What Ifs: Answering Your Burning Queries
What if the GPU doesn’t budge?
Never force it out. Double-check for any screws you might have missed or ensure the PCIe slot latch is fully disengaged.
Is it necessary to uninstall GPU drivers before removal?
While not mandatory, if you’re switching to a different GPU brand (like NVIDIA to AMD), it’s a good practice to uninstall old drivers first to prevent any software conflicts.
Can I upgrade my prebuilt PC’s GPU to any model?
Not always. Ensure the new GPU is compatible with your PC’s power supply unit (PSU) and that there’s enough space inside the case.
Subscribe to our newsletter
& plug into
the world of PC Hardwares


![[Fix] CPU Fan Spins Then Stops (100% Working)](https://www.hardwarecentric.com/wp-content/uploads/2022/09/CPU-Fan-Spins-Then-Stops.jpg)