How to Connect a 6+2 Pin to an 8-Pin GPU Power Connector?
In the world of gaming and high-performance computing, upgrading your GPU can be a game-changer, quite literally. But with great power comes great responsibility, and one of the responsibilities you might encounter is figuring out how to connect a 6+2 pin PCIe power connector to an 8-pin GPU power socket, it’s just like plug-and-play.
Don’t worry; we’ve got you covered with this comprehensive guide that will walk you through the process step by step.
First Understand About 6+2 Pin and GPU Power Socket
Before diving into the nitty-gritty of connecting these pins, let’s break down what they are and why they matter.
6+2 Pin PCIe Power Connector
This little marvel of engineering is a versatile power connector that can serve as either a 6-pin or an 8-pin connector, hence the name 6+2. It’s commonly used to supply power to high-end GPUs and other PCIe devices. The 6-pin portion can provide up to 75 watts of power, while the 2-pin part adds an extra 75 watts when needed, making it suitable for GPUs with varying power requirements.
8-Pin GPU Power Socket
This is the socket on your graphics card that requires a specific power input to function optimally. It’s essential to provide your GPU with the right amount of power to ensure smooth performance and prevent crashes or instability during demanding tasks, like gaming or rendering.
Now that we’ve covered the basics, let’s move on to the practical steps of connecting these two crucial components.
Steps for Connecting the 6+2 PSU Pin to an 8-Pin GPU Power Connector?
Connecting a 6+2 pin PCIe power connector to an 8-pin GPU power socket may sound daunting, but it’s a relatively straightforward process. Here’s a step-by-step guide to help you get it done
Step 1 – Power Off Your PC
Safety first! Before you start tinkering with any internal components of your PC, make sure it’s powered off and unplugged from the electrical outlet.
Step 2 – Identify Your PCIe Cables
Check your power supply unit (PSU) for the PCIe cables. These cables typically have 6+2 pin connectors at one end and are labeled as PCIe or GPU cables.
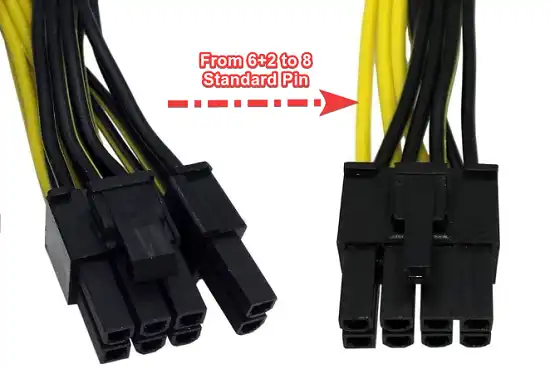
Step 3 – Combine the 6-pin and 2-pin Sections
If your 6+2-pin cable is in two separate pieces, attach the 2-pin section to the 6-pin section. This will create a single 8-pin connector. The two sections should easily slide together and lock into place.
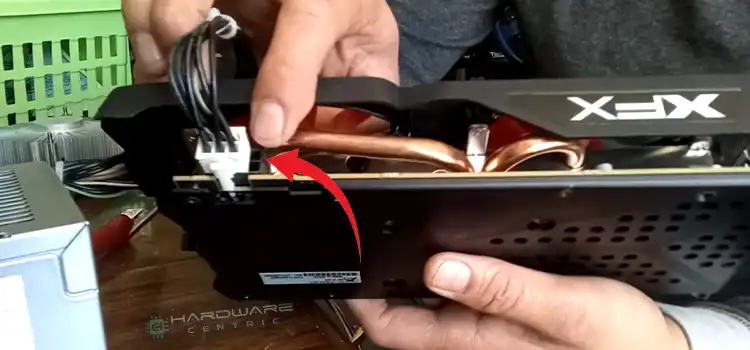
Step 4 – Connect the 6+2 Pin to Your GPU
Take the 6+2 pin end of the PCIe cable and insert it into the 8-pin GPU power socket on your graphics card. The connectors are designed to fit together seamlessly, so you shouldn’t encounter much resistance.
Step 5 – Secure the Connection
Once the connectors are aligned, gently push them together until they click into place. You should feel a satisfying snap when they’re properly connected.
Step 6 – Cable Management
To maintain good airflow and aesthetics inside your PC case, use cable ties or clips to secure the PCIe cables neatly along the case’s interior.
Step 7 – Power On Your PC
With the cable securely connected and your cable management tidied up, plug your PC back in and power it on. Your GPU should now receive the required power, and you can enjoy your high-performance gaming or computing experience.
Will It be Ideal to Use Only 6 Pin Instead of 6+2 Pin?
You might be wondering if it’s okay to use just the 6-pin portion of the 6+2 pin PCIe connector instead of the full 8-pin configuration. The answer largely depends on your GPU’s power requirements.
Using only the 6-pin portion can provide up to 75 watts of power, which may be sufficient for some lower-end or older graphics cards. However, high-end GPUs often demand more power (such as 150 watts of power) for optimal performance, and using just the 6-pin connector may lead to instability, crashes, or throttling during intense tasks.
It’s generally recommended to use the full 8-pin configuration if your GPU has an 8-pin power socket. This ensures that your graphics card receives the maximum power it needs to perform at its best and prevents potential issues.
Final Thoughts
Connecting a 6+2 pin PCIe power connector to an 8-pin GPU power socket is a fundamental task for any PC enthusiast. It’s a straightforward process that ensures your graphics card gets the power it needs to deliver top-notch performance.
Remember that using the right connectors and providing adequate power to your GPU is crucial for a smooth gaming or computing experience. When in doubt, consult your GPU and PSU manuals for specific guidance on power requirements and cable connections.
Frequently Asked Questions
Can I use a 6+2 pin connector in a 6-pin GPU power socket?
Yes, you can use a 6+2 pin connector in a 6-pin GPU power socket. The 6+2 pin connector is designed to be versatile and can function as either a 6-pin or an 8-pin connector, depending on your GPU’s power requirements.
What happens if I use the wrong power connector for my GPU?
Using the wrong power connector for your GPU can lead to instability, crashes, or even damage to your graphics card or power supply unit. It’s essential to use the correct power connectors to ensure proper and safe operation.
Can I use multiple 6+2 pin connectors to power my GPU?
Yes, if your GPU requires more power than a single 6+2 pin connector can provide, you can use multiple PCIe power connectors from your power supply unit. Ensure that your PSU has enough capacity to supply the required power.
Do I need to connect all available power connectors on my GPU?
In most cases, you should connect all available power connectors on your GPU to ensure it receives the required power for optimal performance. Failure to do so may result in reduced performance or instability.
What should I do if my GPU doesn’t fit the available PCIe power connectors?
If your GPU and PSU have incompatible connectors, you may need to use adapters or consider upgrading your power supply unit to one that provides the necessary connectors. Using adapters should be a last resort, as they can introduce compatibility and safety issues.
Subscribe to our newsletter
& plug into
the world of PC Hardwares
![[6 Fixes] Speaker Popping Noise When Turned On](https://www.hardwarecentric.com/wp-content/uploads/2023/09/speaker-popping-noise-when-turned-on.webp)
![[5 Fixes] USB Device Over Current Status Detected](https://www.hardwarecentric.com/wp-content/uploads/2021/10/USB-Device-over-current-status-detected.jpg)