How To Make Thermal Paste at Home | A Step-By-Step Guide
In my DIY tech adventures, I’ve often faced the challenge of finding myself out of a crucial component at the most inopportune times. Thermal paste, a compound crucial for efficient heat transfer between the CPU and cooler, is a common culprit. So, can you whip up some at home in a pinch?
Yes, with a bit of ingenuity and a few household items like toothpaste and graphite powder, creating a makeshift thermal paste is feasible.
But before diving into DIY solutions, it’s crucial to understand the potential risks and the importance of procuring the actual product when possible. Let’s explore this crafty journey together.
DIY Thermal Paste Ingredients
Thermal paste plays a critical role in ensuring efficient heat conduction away from the CPU or GPU to the cooler. By filling in microscopic gaps and air bubbles between the two surfaces, it ensures optimal thermal transfer, which is vital for keeping temperatures in check and maintaining hardware longevity.
While a homemade thermal paste may not match the efficiency of commercial products, it can serve as a temporary fix:
- Toothpaste and Vaseline Mixture: These are commonly found in most households. When mixed in a 1:1 ratio, they can create a paste that conducts heat moderately well.
- Graphite Powder Mix: Graphite is a good conductor of heat. If you have a pencil, you can use its ‘lead’ (which is essentially graphite) mixed with a neutral carrier like Vaseline to make a rudimentary thermal paste.
- Liquid Metal: While not commonly found in households, liquid metal alloys like gallium can be used. However, they can be corrosive to aluminum, so it’s crucial to use them with caution.
Creating the Homemade Thermal Paste: A Detailed Guide
Making thermal paste at home can be an engaging DIY project, especially when you’re in a pinch. While it won’t replace the effectiveness of commercial products, it can offer a temporary solution. Here’s a step-by-step guide to help you craft your homemade thermal compound:
1. Preparation:
- Clean Work Area: Before you begin, it’s vital to have a clean workspace. The last thing you want is contaminants in your thermal paste. Consider using a table with newspaper or paper towels spread out to prevent any messes.
- Gather Necessary Tools: You’ll need a mixing bowl or container, a stirring stick or spoon, and the ingredients for your chosen homemade paste recipe.
2. Choosing Your Mixture:
Toothpaste and Vaseline Mixture:
- Ingredients: Standard white toothpaste (avoid gel-based ones or those with cooling crystals) and Vaseline (or another petroleum jelly brand).
- Ratio: A 1:1 mixture is generally recommended.
Graphite Powder Mix:
- Ingredients: Graphite powder (if you don’t have graphite powder, a pencil lead can be used) and Vaseline or another neutral carrier.
- Procedure: Crush the pencil lead into a fine powder using a mortar and pestle or by simply grinding it with a hard tool.
Liquid Metal (Advanced and Risky)
- Ingredients: Liquid metal alloy like gallium.
- Note: Be cautious as it can be corrosive to some metals.
3. Mixing Process:
Toothpaste and Vaseline Mixture:
- Step 1: Squeeze an equal amount of toothpaste and Vaseline into your mixing container.
- Step 2: Mix thoroughly until you have a consistent, smooth paste.
Graphite Powder Mix:
- Step 1: Add the crushed graphite powder to the container.
- Step 2: Add Vaseline to the container.
- Step 3: Stir until the mixture is consistent.
4. Application:
- Clean CPU/GPU Surface: Before applying your DIY thermal paste, ensure the CPU or GPU surface is clean. You can use isopropyl alcohol and a soft cloth or lint-free paper to clean it.
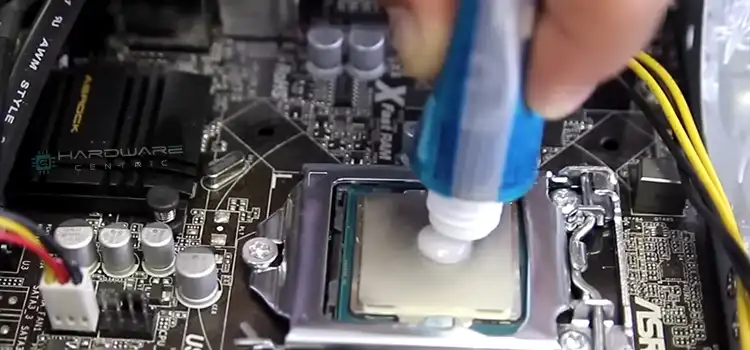
- Applying the Paste: Use a plastic card or spatula to spread a pea-sized amount of the paste onto the CPU or GPU. Ensure it’s spread thinly and evenly to cover the entire surface.
- Mounting the Cooler: Once the paste is applied, carefully place and secure the cooler on top.
5. Clean-Up and Storage:
- Storage: If you have leftover paste, store it in a sealed container, away from direct sunlight or heat sources.
- Clean-Up: Clean any spilled paste immediately, especially from electronic components, using isopropyl alcohol.
Caution and Considerations
- Temporary Solution: Homemade pastes are a temporary fix. They dry out faster and aren’t as effective as commercial products. It’s advisable to replace it with commercial thermal paste as soon as possible.
- Performance Limitations: Don’t expect peak performance from your DIY mixture. It may not handle high overclocking or extended gaming sessions very well.
- Potential Damage: Improper application or use of corrosive materials can damage your components. Always proceed with caution.
Note: Remember that homemade thermal pastes are temporary fixes. They may not provide optimal heat transfer and can degrade quickly. Always monitor your system temperatures and replace the DIY paste with a commercial product as soon as feasible.
Wrapping Things Up
While making thermal paste at home is an intriguing DIY project, it’s essential to remember that it’s a stopgap measure. Always aim to use high-quality commercial thermal pastes for long-term solutions. If you still have any confusion regarding this DIY project, feel free to consult with us or leave a comment in the comment section below. Thanks for reading!
Curious Minds Might Ask
What Are The Long-Term Effects Of Using Homemade Thermal Paste?
While a DIY thermal paste can serve as a stopgap solution, it’s not designed for long-term use. Over time, it may lose its consistency and effectiveness, possibly leading to overheating issues. For a prolonged solution, always switch to commercial-grade thermal compounds.
Why Is My Diy Thermal Paste Not As Effective As Commercial Ones?
Commercial thermal pastes are formulated with specialized ingredients optimized for thermal conductivity. They undergo rigorous testing to ensure the best performance. DIY mixtures, on the other hand, use household items that aren’t specifically designed for this purpose, resulting in suboptimal performance.
Can I Mix Commercial Thermal Paste With A Homemade One?
While it might seem tempting, it’s not recommended. Mixing commercial and homemade pastes can lead to inconsistencies in the compound’s texture and performance, potentially hampering heat transfer efficiency.
Are There Risks Involved In Applying Too Much Homemade Thermal Paste?
Yes, applying excessive thermal paste—whether commercial or homemade—can cause it to spill over the sides of the CPU or GPU. If the paste is conductive, it can lead to short-circuits and potential damage to your components.
If I Don’t Have Vaseline, Can I Use Other Alternatives For The Mixture?
Vaseline (petroleum jelly) is preferred due to its non-conductive nature and consistency. While alternatives like vegetable oil or baby oil might seem viable, they can break down over time, losing their effectiveness faster. They may also pose a higher risk to your components.
Can Diy Thermal Paste Damage My Components?
While the ingredients in most homemade thermal pastes aren’t inherently harmful to electronics, the efficacy of DIY solutions isn’t guaranteed. If the paste fails to provide adequate heat transfer, it can lead to overheating and potential damage. Always monitor component temperatures and act accordingly.
Can I Use Only Toothpaste As Thermal Paste?
While toothpaste can conduct heat to some extent, its efficiency is significantly lower than commercial products. Moreover, it dries out rapidly and isn’t recommended for more than a very short-term fix.
How Often Should I Replace My Diy Thermal Paste?
If you’re using a homemade solution, it’s best to replace it with a commercial product within a few days to ensure optimal performance and safety.
Is There Any Commercial Thermal Paste Alternative That’s Easy To Procure?
Some users have found success using certain metal-based anti-seize lubricants. However, always ensure compatibility and non-conductivity before application.
Subscribe to our newsletter
& plug into
the world of PC Hardwares