How to Clean Thermal Paste in Your CPU Socket (13 Steps Guide)
Before you begin, let’s discuss what you’ll need to do in addition to making this process successful. I’ve put together a small but useful checklist to assist you in getting started.
- Toothpicks with an Extra Fine Point
- Cleaning using Arctic Silver Thermal Paste
- Arctic Silver is a surface cleanser made of silver.
- Q-tips or cotton buds are good options.
- Cloths that are devoid of lint
- Use of a magnifying glass
When You Have the Goods Listed Above in Your Possession, You Are Ready to Begin.
How Do I Clean Thermal Paste in CPU Socket
The step-by-step procedure is shown below –
Step 1: Free up Space on Your Workbench for Working Just on the Motherboard
I understand that this may seem like a no-brainer, but never, ever wipe your CPU socket with water. When it comes to electronics and water, don’t mess around. When cleaning your computer, never use any water, not even the tiniest quantity, ever.
Please do not try to cleanse the CPU socket that is connected to the motherboard within your PC case before beginning this operation. In that space, you will run into problems since it is too little.
It’s also important to note that thermal paste will not cause any harm to your devices. All that is required for thermal paste to cause your CPU to malfunction is for it to go between CPU and socket ports, resulting in an ineffective connection.
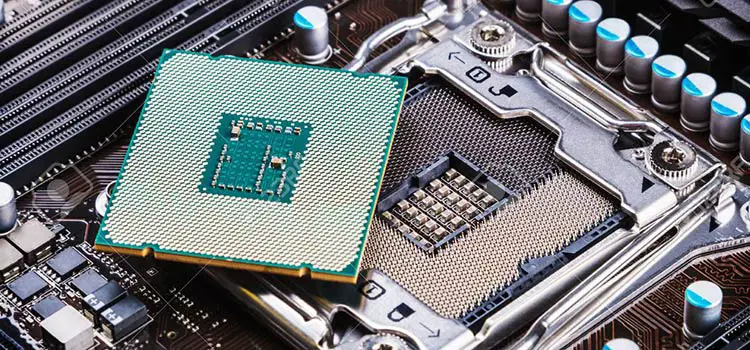
Step 2: Examine the CPU Socket on Your Computer.
CPU Sockets Are Classified Into Two Categories
1: A socket having pins on which the CPU can be mounted. LGA Socket will be referred to as such henceforth.
2: Pins are to be placed into a socket that has holes. A PGA Socket will be referred to as such from here on.
The PGA Socket requires a lot of time to clean, however, you can get away with being a little harder with it as no pins there for protruding from the surface just ready to be bent.
The LGA socket, which has pins that protrude from the board, is a little easier to clean, however, you must be careful not to break the pins.
I’ll go over both sorts of CPU sockets in this section of the procedure.
If this CPU Socket is an LGA Socket having pins, go to step 3. Otherwise, skip step 4. If the socket contains holes in it, it is a PGA socket, and you can proceed to step 4 without stopping.
Step 3: Determine the Direction of the LGA Socket Pins.
There are no plain pins upon the CPU socket that protrude out of the motherboard vertical to the panel like just a flag pole protruding out from the floor.
However, they protrude at a 45-degree angle from the rest of the building.
The difficulty is that these pins are highly prone to being bent. While cleansing, you need to clean in the position of the pin curve rather than against the position of the pin curve. You have to determine the bending direction of the pins.
You can look through the magnifying glass. With a magnifying glass, examine the pins closely to see how they bend and in which direction they bend.
As you cleanse throughout the CPU socket, begin at the bottom point of the pin then make your progress to the tipping end.
If you continue in the opposite direction, the pin will grab the cleaning cloth and otherwise Q-tip you’re using and bend.
If you’re having trouble determining which way the pin bends, try this:
If you flash a strong light immediately above the CPU socket and then view it using a magnifying glass at an angle of 45 degrees, you should then be able to see the effects caused by that same pins upon that CPU socket’s edge.
The angle where the reflecting shadows go shows which way you should cleanse.
Continue to step 4 once you’ve decided which path to cleanse in.
Step 4: Clean the CPU Socket Using Thermal Paste Cleaner.
As a first step, put a small amount of liquid thermal paste cleanser direct to the CPU socket in which the thermal paste has been installed. Make certain that you use sufficient solvent to fill every one of the holes as well as spaces between the pins on the clevis.
It is important not to over-inject so that the CPU socket becomes saturated. Just enough cleaner to get the job done is sufficient.
If you are using too little, you can always add a bit extra on the next clean instead of using too much.
Step 5: Allow 5 Minutes for the Thermal Paste Cleaning to Work.
Using a solubilization agent, or a chemical that forms bonds with the particles of thermal paste, a thermal paste cleanser is used to separate and lift the thermal paste from the edge.
It needs to leave for a few times before it can accomplish this.
Leave the cleaner to do its work for 5 minutes, then return to complete Step 6 of the procedure.
Step 6: Clean the CPU Socket.
The CPU Socket must now be cleaned for the first time, which is a daunting task.
To use a Q-tip and also a very gentle brush in the directions of such pins, begin cleansing an LGA socket containing pins if necessary.
Neither any direction of brushing should be used, and hardly any pressure should be used during application.
Simply put, we are attempting to clean the pin edges.
The brush strokes should be straight. Begin a new line directly adjacent to where you ended the previous line.
Keep in mind that as you are raising the Q-tip far from your CPU, you should raise it in the direction of pins to avoid snagging any.
A large amount of thermal paste may come off instantly. If this is the case, replace Qtips as soon as possible. If you allow the Paste to accumulate, you will merely be shifting it around the socket, rather than cleaning it.
If you have a PGA Socket having holes, pull out such a plastic toothpick then gently slide the toothpick through each hole one at a time, taking your time and being careful not to damage the socket. Once you encounter even the tiniest amount of resistance, pause and remove the pick.
It should begin to remove all thermal paste that has accumulated inside these holes.
Use that Qtip to wipe up any grayish sludge which has been forced outside the holes after they have been cleaned.
Step 7: Remove Any Extra Cleaning Fluid by Wiping It Up.
Now that the cleaning fluid must be soaked with thermal paste droplets, there is nothing left to do but wipe up the remaining cleaning fluid using a clean rag.
Through the use of a Q-tip, gently insert the end of the socket upon that CPU pins of an LGA socket equipped with pins. The cotton end should not be moved. Simply let that sit on the pins to allow it to absorb any excess moisture that may have accumulated.
Continue to absorb and retain more fluid by moving to another spot. Continue to do so until either every one of the fluids has been absorbed or the Q-tip has become saturated with liquid.
Cleaning fluid should be attached to the surface of such CPU Sockets for soaking it if you have a PGA socket having holes.
Use a Q-tip for dabbing every hole after it has been completed; it will remove any remaining fluid from the holes.
Step 8: Do Steps 4-6 Again, Twice.
It is necessary to repeat steps 4 to 6 a second and third time to fully clean the processor socket.
Don’t rush anything. Try to do this very carefully.
Thermal Paste is completely safe for your CPU as well as the motherboard to use. Simply removing sufficient thermal paste out from the socket to ensure a proper connection is all that is required.
It will be quite difficult to completely clean all the thermal paste. The farther you wipe, the greater the likelihood that you will damage your socket.
It is just good for cleaning the CPU socket to a sufficient degree for it to function.
Step 9: Time for Drying.
You should have a cleaned CPU Socket now since you’ve completed the preceding steps three times; however, it is not required to be ideal at this point. It doesn’t matter whether or not the pins may initiate contact as far as they can.
After that, you will need to wait for your Motherboard to get dry completely. For a sufficient period, it should be kept in a warm, dry environment.
Step 10: Wash Away the Surfaces That Come Into Contact With the Product.
Afterward, the contact surfaces must be cleaned.
Make another Q-tip and place a drop or two of the solution on it this time around.
Put the Q-tip inside the directions of the pins over an LGA socket having pins, ensuring sure to make contact while remaining gentle.
Steps 4-6 should be repeated whether any thermal paste breaks out onto the Q-tip during the application. On pinpoints, there will be no trace of thermal paste.
When you are washing a PGA socket that has holes, add the purifying solution to the q-tip then push onto each hole until the purifying solution is completely dissolved.
Excess thermal paste that gets on the Qtip should be wiped away immediately and the process should be repeated from steps 4-6.
Step 11: Excess Purifying Solution Should Be Removed.
Using a dry Q-Tip, brush it across the pins and tap the sockets holes to clear any extra fluid.
Step 12: Let for Drying.
Wait for about a 24-hour drying period for such CPU socket.
Step 13: Reformat the CPU and Also the Computer and Run a Test.
Following the cleaning process, you have to reformat the CPU and other components before testing the PC to ensure that it is operational. If the computer does not boot properly, it is possible that the Socket still has a little quantity of thermal paste on that. If this is the case, repeat the process from the beginning.
Conclusion
This is how you can simply clean thermal paste in your CPU socket. You have to be very careful while doing so.
Subscribe to our newsletter
& plug into
the world of PC Hardwares


![[6 Simple Fixes] AMD CPU Fan Not Spinning](https://www.hardwarecentric.com/wp-content/uploads/2023/09/AMD-CPU-Fan-Not-Spinning-1.webp)