How Do I Fix The Orange Light on My Motherboard?
The orange light on a motherboard signifies a hardware failure preventing the system from booting properly. This light acts as an alert that a component like the CPU, RAM, or graphics card may not be connected or functioning as expected. Diagnosing the root cause is important for restoring normal computer functionality. Leaving the issue unaddressed can lead to data loss or the inability to power up the machine at all.
Troubleshooting an orange motherboard light requires methodically testing different hardware configurations and connections. Simple steps like reseating the RAM and cables can resolve basic connection problems. Further diagnosis may involve replacing the CMOS battery, resetting the BIOS, testing alternate graphics cards, or verifying the power supply voltages.
With some strategic testing and analysis, the orange light can often be addressed with simple solutions. Carefully working through potential issues will hopefully yield important clues and get the motherboard operational once again. When ready, I’ll explore detailed troubleshooting steps to methodically target the root cause.
What Does the Orange Light indicate?
The illumination of an orange LED on a computer motherboard signifies that a critical fault has been detected, preventing the system from booting properly. This visual cue serves as an important alert that a hardware or firmware issue needs to be addressed before the machine can start up normally.
Specifically, the orange light is a signal that a key component such as the CPU, RAM, graphics card, or boot drive has failed initialization when powering up. It could also indicate an inability to pass control from the motherboard BIOS to the operating system kernel. The light may also signify unstable power delivery or connectivity problems with a key sub-system.
Essentially, the orange LED indicates a power or initialization issue that is halting progress through the normal boot sequence. The motherboard uses this visual code to communicate the presence of a fault to the user quickly and easily. Diagnosing the underlying cause will be an important first step before the computer can resume normal function.
Solid Orange Light on the Motherboard?
A persistent solid orange light on a motherboard typically indicates a key component failure preventing the computer from booting properly. Methodically testing different hardware configurations is crucial to isolate the fault.
As a first step, re-seat connectors and cables throughout the system, pressing down firmly to ensure proper contact. Be sure to re-connect the 24-pin motherboard power cable, supplemental CPU power, and other power cables feeding components.
If the solid orange light remains, simplify to minimum hardware by removing all non-essential devices and using just one RAM stick in the primary slot. Test alternate RAM sticks individually in this minimum configuration. If one allows system boot, the other stick likely failed.
Trying an alternate graphics card or integrated graphics, if available, can rule out a GPU issue. Resetting the CMOS battery may also clear erroneous BIOS settings blocking boot when hardware is good.
If the minimum system still fails, suspect a motherboard, PSU or CPU failure. Compare debug code LEDs and system behavior to motherboard manual troubleshooting codes. Consult manufacturer support with your make/model for further recommended testing procedures when basic steps cannot isolate the fault.
With patience, careful notation of system feedback, and methodically trying steps to rule out variables, the source of a solid motherboard orange light can be uncovered.
Flashing Orange Light on the Motherboard?
An intermittent or flashing orange LED on a motherboard typically indicates an issue with the power delivery system preventing normal system boot. As the first troubleshooting step, thoroughly inspect connections from the power supply to the motherboard and components.
Re-seat the 24-pin ATX and 4/8-pin EPS motherboard power connectors, as well as all component power connectors, pressing down firmly. Check power supply cables for damage which could cause abnormal voltage.
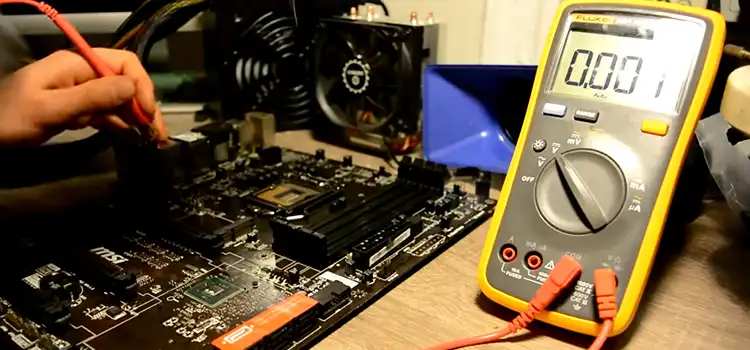
If cabling checks out, test the power supply integrity. With the PSU disconnected from the system, use a paper clip or jumper wire to short the green “PS ON” wire to any black “ground” wire on the 24-pin cable. If the PSU fan fails to spin up, the PSU has likely failed.
Alternatively, connect a multimeter to check critical voltage rails during system boot attempts. The +12V, +5V and +3.3V outputs should remain stable within ~5% of specifications under load if the PSU is operating properly.
If cabling and output voltages check out, further motherboard troubleshooting would center on VRM temperatures and capacitors when orange flashes suggest power delivery issues specifically. A BIOS update may also reduce certain power faults.
Signs of an Orange Light on Motherboard
The illumination of an orange LED on a motherboard signals a malfunction preventing normal system boot. The issue typically stems from hardware failures, BIOS problems, power delivery problems or overheating.
Hardware Failure
Hardware faults with components like the CPU, RAM or boot drive can trigger an orange light. The system is unable to initialize when vital parts are dead or undetected. Hardware faults can prevent system boot in various ways:
CPU failure: A failed CPU chip can cause immediate power-on self-test (POST) failure since the system cannot initialize without a functioning processor. Symptoms may include no power or a solid orange light.
RAM failure: Faulty memory modules or improperly seated RAM sticks interrupt the boot process if memory can’t initialize. This commonly triggers POST failure indicated by orange RAM debug LEDs.
Power failure: Issues providing stable power like faulty PSU cables, ports, or power circuitry on the motherboard can lead to component failure or inability to turn components on. Orange lights signify the board cannot initialize devices to boot.
BIOS Issue
The BIOS coordinates and initializes all hardware on boot. Corruption or the need for updates can cause conflicts. BIOS coordination issues during the POST process will halt booting:
BIOS corruption: Settings are lost or BIOS code is damaged. Errors in low-level UEFI/legacy BIOS code or key configuration data can stop initialization processes in their tracks when the BIOS crashes or hangs.
BIOS update needed: The existing BIOS version is too old for new hardware. Code incompatibility from an outdated BIOS version not supporting new hardware can also freeze the boot process until an update is performed.
Power Supply Unit Problems/Not Getting Enough Power
An unstable or insufficient power supply can lead to the orange LED lighting up on a motherboard. If the PSU fails to provide the required wattage to components or has poor voltage regulation, hardware may not initialize properly during boot. Symptoms can manifest as an inability to turn on, random shutdowns, or failure to boot with the orange LED indicating power issues are not allowing the board and components to start correctly.
Your System (PC) Is Overheating
Excessive heat buildup within the PC case can cause the motherboard to hit temperature thresholds and shut down as a protective measure, lighting the orange LED in the process. This is commonly accompanied by sudden system shutdowns and failure to power back on properly with the fans and components turning on briefly before powering off again in a continuous reboot loop with the orange light indicating an over temp related failure.
Motherboard Damaged
Physical defects on the motherboard itself from issues like water damage, cracked circuit traces, or bent/broken port connectors and slots can all contribute to failure conditions during the system boot process. This may present as apparent component failures triggering the illuminated orange LED, but on closer inspection damage to the board could be the root cause of why integral subsystems cannot initialize properly to allow booting into the OS.
RAM Incompatibility
Installing RAM modules that are outside of the supported specifications for a motherboard can frequently lead to memory errors and failed initialization during POST, resulting in the orange LED.
Common incompatibility issues stem from exceeding maximum RAM speed ratings, mixing incompatible memory types like DDR3 and DDR4 on unsupported boards, or even using mismatched stick sizes/configs in the wrong DIMM slots.
Attempting to boot with incompatible RAM can manifest as symptoms like memory parity check failures, inability to detect full RAM capacity, allocation errors for the CPU or integrated graphics, and overall configuration problems between components leading to the failure to initialize memory properly for booting into the OS with the BIOS only able to light up the orange LED due to RAM issues.
Using incompatible RAM risks serious boot up issues and even potential hardware damage depending on the severity of the mismatch. Referencing motherboard manual guidelines on supported memory configurations is highly recommended.
Troubleshooting Steps for Orange Light on My Motherboard
Starting an orange light on your motherboard can be a cause for concern, signaling potential issues within your computer system. This guide will walk you through a series of troubleshooting steps to identify and address the root causes behind the orange light. Follow these instructions systematically to regain the normal functionality of your system.
Investigate Power Supply Unit (PSU) Issues
Encountering an orange light on the Motherboard may indicate a problem with the power supply unit (PSU). Follow these steps to troubleshoot:
Check Connections: Ensure the PSU is correctly connected to both the wall outlet and the Motherboard.
Physical Inspection: Examine the PSU for any visible damage, such as bent pins or a damaged casing.
Voltage Output Test: Use a multimeter to test the rated voltage output of the PSU. If incorrect or damaged, consider replacing it with a new unit.
Further Investigation: If the issue persists, explore other potential system problems beyond the PSU.
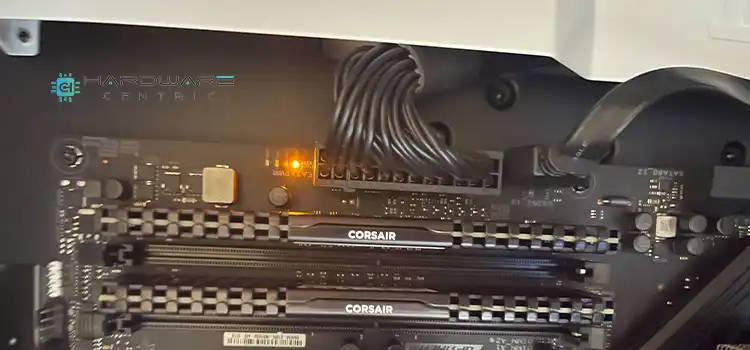
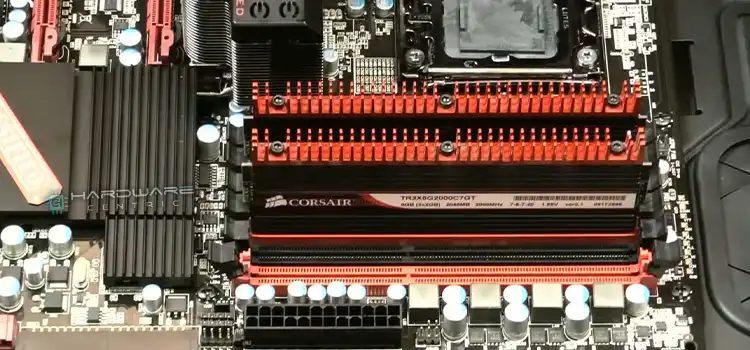
Evaluate RAM and Slots for Hardware Errors
Hardware errors or malfunctions may trigger the orange light. Investigate RAM and its slots for troubleshooting:
Seating and Cleaning: Ensure the RAM module is correctly seated in the slots, and if dirty, clean it appropriately.
Compatibility Check: Confirm compatibility between the RAM and Motherboard by checking specifications and compatibility lists.
DRAM Light Indications: Address any DRAM light indications promptly by verifying the RAM’s compatibility and functionality.
Cross-System Testing: If previous steps fail, test the RAM on other computer systems to identify potential faults, and replace if necessary.
Top Recommended RAM Options:
– Corsair Vengeance RGB PRO 16GB
– Crucial RAM 32GB Kit (2x16GB)
– G.Skill Ripjaws X Series 16GB
Ensure Processor Integrity
The processor plays a crucial role in overall system operation and may contribute to the orange light issue. Follow these steps:
Secure Installation: Confirm that the processor is securely and properly installed in the socket.
Reseating: Try reseating the processor to ensure a proper connection that might resolve the problem.
Visual Inspection: Check for visible damage or defects on the processor.
Compatibility Check: Ensure compatibility between the processor, socket, and Motherboard.
Alternate Processor Test: If previous steps do not yield results, consider testing with a different processor if available.
Validate Proper Power Cable Connections
Disruption in the power supply to the Computer system can contribute to the orange light on the Motherboard. Ensure proper power cable connections:
Supply Confirmation: Confirm the proper supply of power from the power outlet to the PSU.
Thorough Cable Inspection: Check the condition of wires and the wiring structure, looking for signs of wear or bending.
Reconnection: Unplug all cables connecting the Motherboard or internal hardware to the power supply and plug them in again.
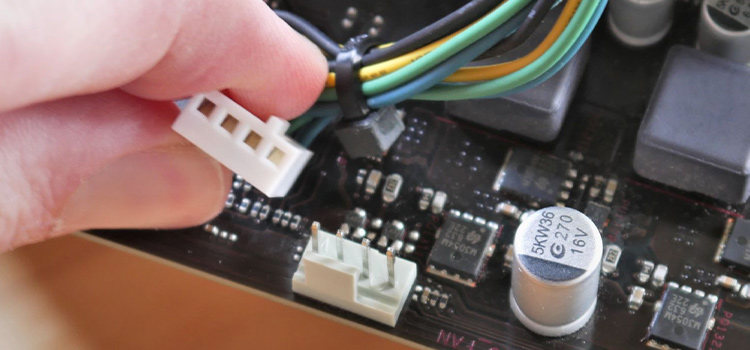
Replace CMOS Battery for BIOS Stability
The CMOS battery is crucial for maintaining BIOS settings even when the PC is turned off. Follow these steps for replacement:
Turn Off PC: Power off the PC and disconnect it from the power outlets.
Remove CMOS Battery: Take out the CMOS battery attached to the Motherboard.
Reset BIOS: Press the power button continuously for at least 15 to 30 seconds to reset the system’s BIOS to factory default.
Reconnect and Turn On: Reconnect the power sources, turn on your Computer, and check for improvements.
Reset BIOS Settings for Stable Configuration
BIOS controls critical tasks in the Computer system, and misconfigurations may lead to the orange light issue. Reset BIOS to factory default using the following steps:
Power Off: Turn off your PC and disconnect the power cable from the power outlets.
CMOS Battery Removal: Take out the CMOS battery attached to the Motherboard.
Reset BIOS: Press the power button continuously for at least 15 to 30 seconds.
Power On: Reconnect the power sources, turn on your Computer, and check for stability.
Check Graphics Card for Compatibility
An orange light on the Motherboard may indicate issues with the graphics card (GPU). Investigate compatibility and replace if necessary:
Shutdown and Unplug: Shut down the Computer and unplug all cables.
Clean Graphics Card: Open the case, locate the graphics card, and clean off any dust or dirt using compressed air.
Reattach Cables: Reattach all cables and power on the Computer.
Professional Assistance: If the issue persists, consult a professional repair service or the manufacturer for further assistance.
Prevent Overheating for System Health
An orange light signaling overheating can lead to component damage and system instability. Prevent these issues:
System Cleaning: Clean the system’s interior to remove dust and debris.
Fan Functionality: Ensure that PC fans are working properly to dissipate heat effectively.
Thermal Paste Check: Confirm that the thermal paste on the CPU and GPU is still effective.
Additional Cooling Solutions: Consider additional cooling solutions, such as fans or liquid cooling, if necessary.
Professional Assistance: Seek further assistance from a professional repair service or manufacturer if the problem persists.
Verify Correct Hardware Assembly
Incorrect hardware assembly may result in an orange light. Confirm proper configuration:
System Re-examination: Carefully re-examine the system’s assembly, checking for correct component placement.
Connection Double-Check: Double-check that all components are securely connected and properly configured.
Manual Consultation: If unsure about the proper assembly procedure, consult the Motherboard and other components manual or seek assistance from a professional repair service or manufacturer.
Resolve Short Circuit Issues
A short circuit can cause the orange light and potential damage. Address the issue with the following steps:
Immediate Shutdown: Turn off and unplug the system immediately.
Interior Inspection: Carefully inspect the system’s interior for signs of damage, including burn marks, melted components, and loose or disconnected cables.
Faulty Component Identification: If a faulty component is identified during inspection, replace it promptly.
Common Questions
Q1. What if replacing hardware doesn’t fix the issue?
A1. Double check connections, try resetting the CMOS battery, inspect for damage, or contact the manufacturer if hardware replacements still result in failure to POST with the persistent orange LED.
Q2. Is it safe to update the BIOS?
A2. Updating BIOS is safe if instructions are followed precisely. Use motherboard support tools to prevent BIOS corruption.
Q3. When should I seek professional repair service?
A3. If systematic troubleshooting does not reveal the orange light’s root cause, seeking professional motherboard repair services may be the most cost-effective next step.
Q4. Why does my PC work fine in Safe Mode with the orange light?
A4. Safe Mode starts fewer background services. If normal boots succumb to the load, overtaxed hardware due to faults or aging could cause the light.
Q5. Can a failing power supply cause my motherboard to light orange?
A5. Yes, insufficient 12V/5V rails from a dying PSU can cause stability issues misleadingly resembling component failures.
Q6. Is an orange blinking light different than solid orange?
A6. Yes, blinking indicates looser connections versus a solid orange signaling complete component failures during POST.
Final Words
The most common fixes for an orange motherboard light include reseating connections, replacing hardware, resetting BIOS, or updating firmware. Preventative measures like installing compatible components and adequate cooling can reduce risk of orange light boot failures. If systematic troubleshooting does not resolve the issue, contacting manufacturer support or seeking professional repair may be needed to finally determine the root cause and restore functionality.
Source:
1. https://www.minitool.com/news/orange-light-on-motherboard.html
3. https://motherboardtimes.com/orange-light-on-motherboard/4. https://tech4gamers.com/orange-light-on-motherboard/
Subscribe to our newsletter
& plug into
the world of PC Hardwares
![[Explained] What Is Jtpm1 On Motherboard?](https://www.hardwarecentric.com/wp-content/uploads/2023/11/What-Is-Jtpm1-On-Motherboard.webp)
![How To Fix VGA Light On Motherboard MSI [Complete Solution]](https://www.hardwarecentric.com/wp-content/uploads/2023/10/How-To-Fix-VGA-Light-On-Motherboard-MSI.webp)
