How Can I Overclock 2070 Super | Pushing Boundaries
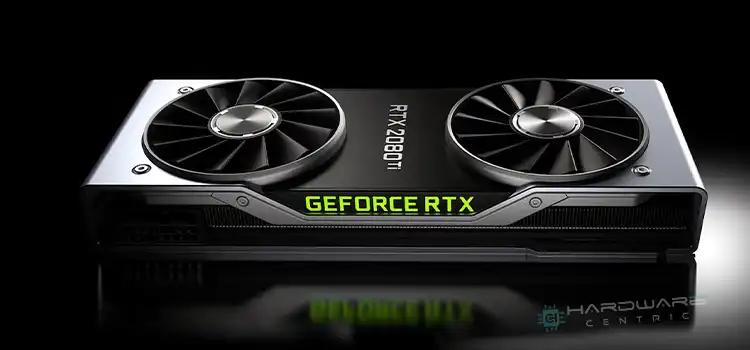
When I took the plunge into the world of gaming and high-end graphics, the NVIDIA RTX 2070 Super became my trusty steed. This card, straight out of the box, is already a beast. But as an enthusiast, I couldn’t resist pondering: what if I could push it just a tad more?
With cautious overclocking, the 2070 Super can indeed soar beyond its out-of-the-box performance.
However, like any tech endeavor, this journey isn’t without its risks and nuances. If you’re keen to maximize the potential of your 2070 Super while ensuring its longevity, join me as I guide you step by step through the overclocking process.

Preparing for Overclocking
Overclocking essentially means setting your GPU to run at speeds higher than its factory settings. While the 2070 Super is a powerhouse on its own, overclocking can squeeze out that extra juice, making your games run smoother and your graphics tasks more snappy.
Before you get started, you need to make sure your 2070 Super is ready for overclocking. Consider the following to make sure your GPU is ready for the journey:
- System Requirements: Ensure your PC has adequate cooling. An efficient cooling system minimizes the risk of overheating.
- Software Arsenal: Download reliable overclocking software. MSI Afterburner and EVGA Precision X1 are excellent choices for NVIDIA cards. You’ll also need benchmarking tools like 3DMark and Unigine Heaven to test stability.
- Drivers: Update to the latest NVIDIA drivers. This ensures compatibility and often delivers performance enhancements.
Overclocking Step-by-Step Process
Overclocking can be likened to tuning a car to get increased performance, but it requires precision, patience, and a solid understanding of your hardware. With the NVIDIA RTX 2070 Super, there’s a decent headroom for boosting its capabilities, but this power must be wielded wisely.
Step 1: Establish a Baseline
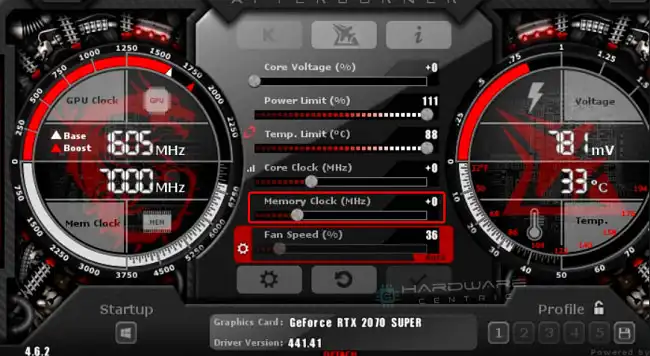
- Monitor Initial Conditions: Before making any adjustments, it’s essential to understand the GPU’s default state. Use GPU-Z to get detailed information about core and memory clocks, power consumption, and GPU temperature.
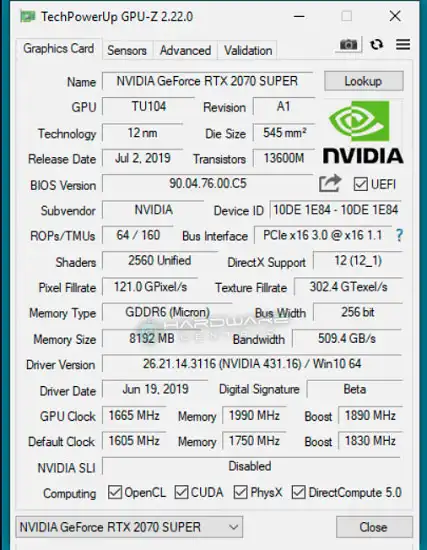
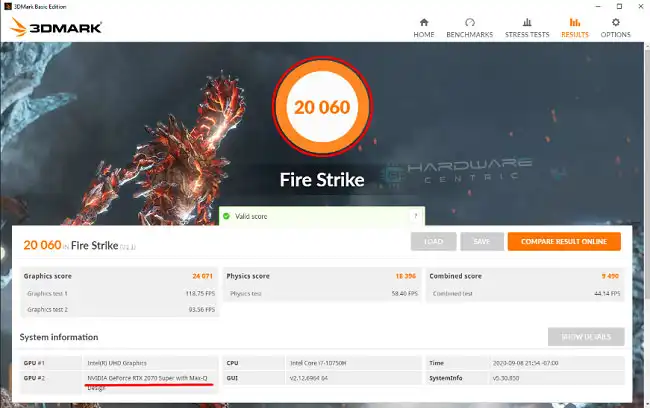
- Initial Benchmarking: Run a graphics benchmark like 3DMark or Unigine Heaven. Note the scores and average temperatures during the test. This gives you a clear performance starting point and will help later in gauging the impact of your overclocking efforts.
Step 2: Increase Power and Temperature Limits
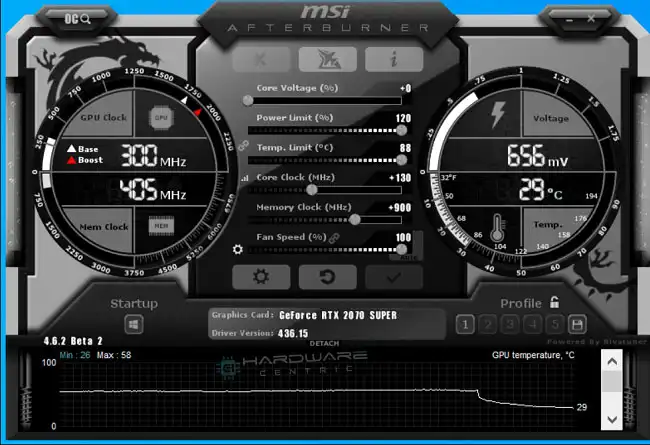
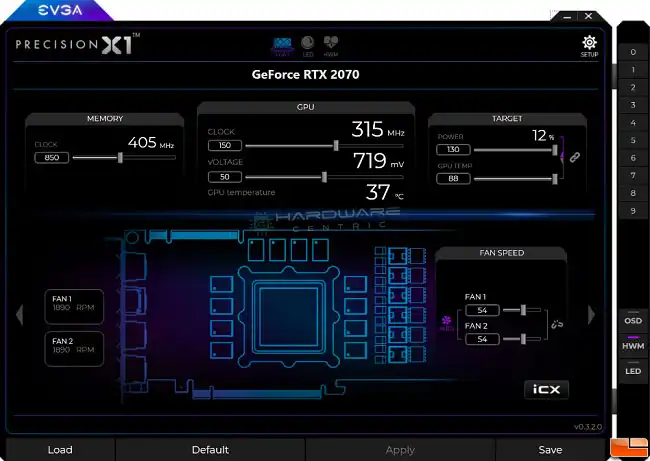
- Maximizing Power: In the overclocking software (e.g., MSI Afterburner), increase the power limit slider to its maximum. This action allows the GPU to draw more power, if needed, during heavy workloads.
- Adjusting Temperature Limits: Along with the power limit, increase the temperature limit. It ensures the GPU will maintain higher clocks for longer, even if it gets a bit hotter.
Step 3: Core Clock Overclocking
- Incremental Adjustments: Start with small increases, typically between 20-30 MHz. Apply the change and test with a quick benchmark or stress test.
- Monitoring for Stability: Watch for any graphics anomalies, like artifacts or flickering. If everything seems stable, you can further increase the core clock in similar small increments.
- Finding the Limit: Continue this process until you encounter instabilities or if the benchmark crashes. When that happens, dial back by 10-15 MHz to ensure a safety buffer.
Step 4: Memory Clock Overclocking
- The Starting Point: After establishing a stable core clock overclock, reset the memory clock to its default setting.
- Gradual Increases: Boost the memory clock speed in small steps, around 50 MHz at a time. Memory often has more overclocking headroom than the core, hence the larger increments.
- Testing and Monitoring: As with the core clock, run a benchmark after each adjustment. Memory instability often manifests as visual artifacts.
- Determine Stability: If issues arise or the benchmark crashes, dial back by 50 MHz to get to a safe and stable memory clock speed.
Step 5: Stress Testing and Validation
- Extended Testing: Once you believe you’ve found the optimal core and memory clock speeds, it’s time for extended testing. Run a benchmark loop or a demanding game for a couple of hours.
- Temperature Monitoring: Ensure temperatures remain within acceptable limits. For the RTX 2070 Super, keeping it under 80°C is advisable.
- Make Adjustments as Needed: If you encounter any crashes or artifacts during extended testing, consider dialing back the overclock slightly for added stability.
Remember, every GPU is unique. What works for one RTX 2070 Super may not necessarily work for another, even if they’re the exact same model. It’s all about the silicon lottery, so always trust your own testing over general recommendations.
Safety First: What to Watch Out For
- Temperatures: Keep a close eye on GPU temperatures. Overheating not only risks hardware damage but can also reduce the component’s lifespan.
- Artifacts: If you notice visual glitches or “artifacts”, it might indicate that the GPU is being pushed too hard.
- Crashes and Instability: Any system crashes or instability is clear signs that the overclock might be too aggressive.
Summing It Up
Overclocking the 2070 Super is a thrilling journey into the potential of your GPU. While the performance gains can be intoxicating, always prioritize the health and safety of your hardware. With meticulous steps and a dash of patience, you’ll be on your way to an optimized gaming or graphic experience.
Further Inquiries
Is overclocking my 2070 Super safe?
In general, modern GPUs, including the 2070 Super, are designed with safety limits. However, pushing any component beyond its standard settings carries inherent risks.
Will overclocking void my warranty?
Many manufacturers now allow mild overclocking without voiding warranties. Still, extreme modifications, especially voltage changes, might affect warranty status. Always check with your GPU manufacturer.
How long should I test my overclock?
For best results, test a new overclock setting for at least 30 minutes. For final stability checks, consider testing for several hours.
Subscribe to our newsletter
& plug into
the world of PC Hardwares