How Many SATA Ports Do I Have? Ways to Find Out
One of the most asked questions by people who are looking to upgrade or add any storage interface to their computer is how many SATA ports they have at their disposal. And it’s only fair to ask since SATA ports are usually located on the motherboard itself and are not visible from the outside.
Depending on your motherboard model and type, you can expect to have anywhere from 4 to 8 SATA ports. However, if you are using a mini-iTX motherboard, expect to have fewer ports. In this article, we will go through what’s SATA, how to figure out how many of those you have, and how you can expand it if you need more. So, let’s begin.

What Are SATA Ports and Its Version?
SATA or Serial Advanced Technology Attachment ports are the L-shaped ports located on the motherboard. They are mostly used to connect storage devices to computers, for example, HDDs, and SSDs, or even older optical readers like CDs, DVDs, and Blu-Ray drivers.
Different Versions of SATA
There are three generations of SATA interface, they are:
SATA 1.0 (SATA I): Data Transfer Rate: 1.5 gigabits per second (Gbps)
Features: The original SATA standard, offers a significant speed improvement over the older IDE (Parallel ATA) interface.
SATA 2.0 (SATA II): Data Transfer Rate: 3.0 Gbps
Features: SATA II doubled the data transfer rate compared to SATA I, capable of transferring data at up to 3 Gbps.
SATA 3.0 (SATA III): Data Transfer Rate: 6.0 Gbps
Features: SATA III doubled the data transfer rate once again, reaching speeds of up to 6 Gbps. It is the most common SATA standard and is still widely used for connecting hard drives and SSDs.
However, the most beautiful thing about SATA is that it has backward compatibility. This means, you can use a SATA I device with a SATA II or SATA III port, although the speed will be of the lowest SATA version.
Ways to Find Out the Number of SATA Ports
Here’s how to find out how many SATA ports you have on your motherboard so that you can figure out how many SATA devices you can use on your computer.
Check Motherboard Specs
The best and by far easiest way to find out the total number of SATA ports on your motherboard is to check the motherboard spec sheet. You can either do it by checking the motherboard packaging, which usually includes all the specs, or you can simply go to the manufacturer’s website and download the user manual from there.
However, if you have lost the motherboard packaging and don’t know the exact model of the motherboard that you are using, move on to the next solution.
Use a Third-Party App
To find out the exact model of your motherboard, you can use any third-party application like the CPU-Z. just go to this page and download the CPU-Z application, install and open it. Then navigate to the motherboard/ mainboard section and you will see the exact model of the motherboard.
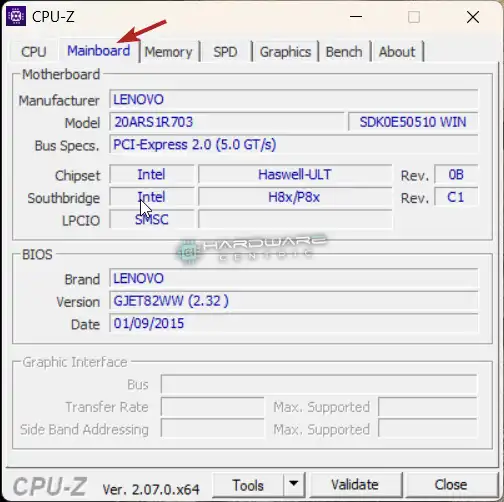
Use the model to search in Google. You can either search directly for how many SATA ports the ‘example’ motherboard has, or you can go to the official website of the manufacturer to look for that info.
Check Manually
If for some reason the first two methods don’t work for you, or you simply don’t have an internet connection at the moment, you can always do a manual checking, which will give you the most accurate result.
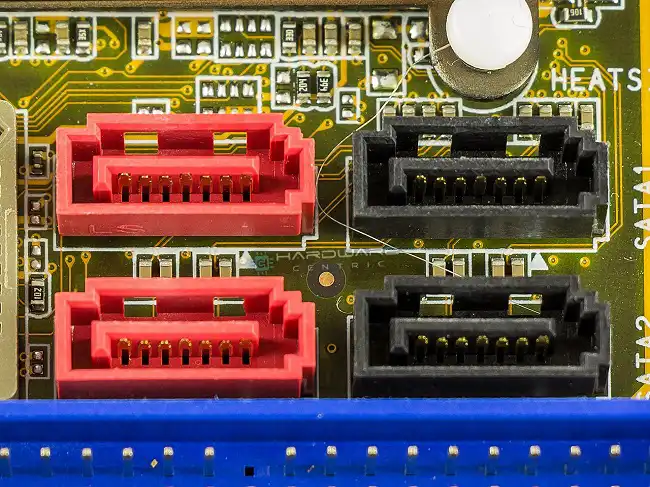
Take necessary precautions, turn off your PC, and disconnect it completely from the power source. Then open up the casing. It’s the L-shaped ports as shown in the picture above that you should be looking for. Count how many of those you have. Don’t forget to include the already connected ports, like the port that has your HDD or SSD connected to it.
Use BIOS / UEFI
Although not all BIOS or UEFI support this feature, some do. Therefore, it’s worth giving a shot. Just restart your computer and enter your BIOS by pressing F1 or Del key immediately after. You might need to try a couple of times if you haven’t entered the BIOS before.
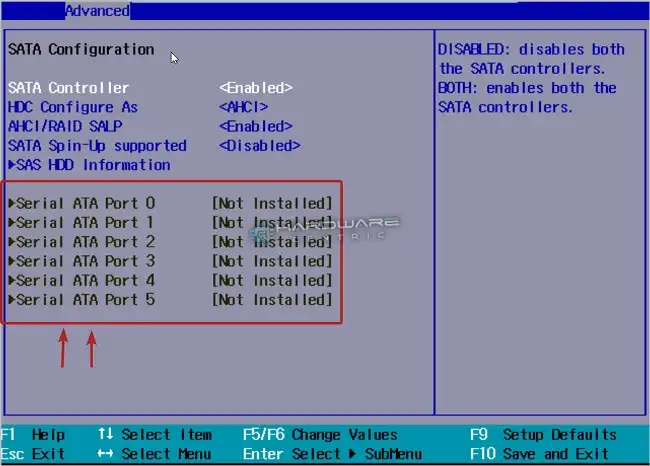
Once you have entered the BIOS, you can find the number of ATA or even SATA ports under the Devices or Drivers section. Look around until you find it, as it may be a bit different in your case.
Note: When you are inside the BIOS, don’t make any changes to things that you do not understand, otherwise your system might crash or won’t even boot at all. However, if you make any changes accidentally, just use the don’t save option while exiting the BIOS.
Ask Around
If none of the options that we’ve mentioned above works for you, you can always ask around. If you have a friend, co-worker, or a family member who is a techy person, ask them, they might know. Also, you can ask around in forums like Reddit or Quora. Make sure that you mention your motherboard name and model correctly.
How to Increase the Number of SATA Ports?
So, what if need an additional SATA port to connect a new storage device to your computer but you don’t have one? Well, there are multiple ways to increase the number of SATA ports in your computer. You can use a SATA expansion card which connects to an existing SATA port and gives you multiple SATA ports on the other end.
However, if there are no free SATA ports available in your motherboard, you can always use a PCIe SATA expansion card which connects to the PCIe slot of your motherboard. Both of these come very cheap and are reliable.
Sum Up
The number of SATA ports you have on your motherboard depends on the model and the type of motherboard you are using. Regular motherboards can have anywhere from 4 to 6 SATA ports. Specialized motherboards for gaming or server PCs can have more SATA ports. They usually feature 6 to 10 SATA ports. If you need more, on a permanent basis, you should look for a specialized motherboard brand like Onda, which features more than 30 SATA ports on some of their motherboard models.
Subscribe to our newsletter
& plug into
the world of PC Hardwares
![[8 Fixes] PC Stuck In Boot Loop No Display](https://www.hardwarecentric.com/wp-content/uploads/2023/02/PC-Stuck-In-Boot-Loop-No-Display.webp)
![[3 Fixes] Intel Dual Band Wireless Ac 3168 Not Working](https://www.hardwarecentric.com/wp-content/uploads/2022/10/How-To-Solve-Intel-Dual-Band-Wireless-Ac-3168-Not-Working-Issue.jpg)
![[2 Methods to Fix] 4 Sticks of Ram Not Working](https://www.hardwarecentric.com/wp-content/uploads/2023/07/4-Sticks-of-Ram-Not-Working.webp)
