[Fix] 0xc00007b Blue Screen Windows 10 (100% Working)
As soon as your computer is powered on, the BIOS selects a suitable, bootable HDD and executes code included in the Master Boot Record (MBR) at the beginning of such a hard disk drive. The MBR code then imports the boot sector first from the active disk, and the process continues. The bootloader, that loads your operating system, is then loaded by the boot sector code after that. This boot process is paused when any PC abruptly loses access to the computer partition while startup, resulting in the appearance of the “0x0000007b” error screen and the display of a blue screen.
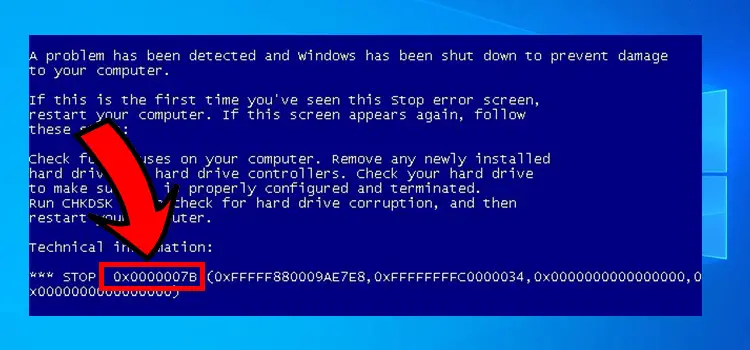
How to Resolve – ‘0xc00007b Blue Screen Windows 10’ Issue
If you are seeing this Stop error screen for the very first time, try to restart your device. If the above screen comes again, use the procedures below to resolve it:
Check to see if your machine is infected with viruses. Start by removing any new hard disks or HDD controllers that have been installed. Check the configuration and termination of your hard disk to ensure that it is correctly set up and terminated. After running CHKDSK /F for checking any hard drive failure, restart your pc to see if the problem was resolved.
Any recently installed software or hardware should be disabled or removed if the problem persists. Disable any memory-related options in the BIOS, such as cache or shadowed. Safe Mode can be used to delete or deactivate components from your computer. To access Safe Mode, reboot your pc and press F8 for selecting Advanced Startup Settings, and choose the Safe Mode.

It has been observed that this inaccuracy can occur due to the following factors:
1: Bootloader files are missing or corrupt
It is the most prevalent reason for this error is the absence, corruption, or misconfiguration of boot-related items on a system. These issues could be caused by disk write issues, power failures, boot sector malware, or mistakes committed while directly configuring those files.
2: Incorrect BIOS configuration
If the operator has initially made modifications to a BIOS, the new settings that may have been entered may be incompatible with the HDD. The UEFI/Legacy BOOT configuration setting seems to be the most famous in this regard, and users need to use caution while making modifications to the BIOS settings.
Another possibility would be that the SATA controllers have been configured in the BIOS with an improper work mode. There will be three basic SATA control system work options available for many of these PCs: read, write, and read/write.
- IDE (Integrated Development Environment) is one of the basic modes, which handles the SATA controller in the same manner as legacy IDE control systems handle ATA drives: the device controls practically no read/write-related circuitry and only acts as the most austere of gateways, proxying info from drive systems.
- AHCI (Advanced Host Controller Interface) is a far more developed and modern mode that includes extensive optimized device read/write functionality and caching, leads to significant speed improvements over IDE.
- RAID (Redundant Array of Independent Disks) mode combines many disk storage drivers into one logical unit for improved performance, durability, or a mix of the two.
The boot function will be delayed if the user’s HDD does not allow either of these forms or if Windows is launched and booted by single-mode however another mode was selected.
3: Boot sector virus
Another possibility for this problem is the presence of boot sector malware, which prevents your system from starting up. Installing and trying to run an antivirus application that can remove boot-sector infections may be sufficient to resolve the problem.
4: Registry is damaged
This error can also arise if critical components of the system registry have become corrupted. Disk read/write problems are common causes of this problem, and a disk checking application may be used for scanning for and correcting any faults found on the disk.
5: EFI bootloader is corrupted
It is also possible for the EFI bootloader, which was introduced with Windows 8, for becoming corrupted or incorrect. If this is the case, the application will be recreated to correct the problem.
Fixing Methods of “0x0000007b” on Windows 10
It is necessary to utilize the Microsoft Windows installation CD or DVD for many of the methods listed below. For situations where your computer certainly didn’t come including a Windows setup disk or when your Windows installation media has been lost or damaged, you can utilize Easy Recovery Essentials for Microsoft instead. EasyRE will instantly detect and correct a wide range of issues, and it may be used to resolve this issue if the steps outlined below are followed.
Method 1: Rebuild Boot Files Using Easy Recovery Essentials
System problems caused by a lost or malfunctioning boot can be resolved with one click automated program of the Easy Recovery Essentials repair feature. Create in and BCD files from new on the current bootable disk for Windows via deleting them and reinstalling them. Moreover, it scans the hard drive against malware and disables them from the computer. Being a portion of the automatic repair procedure, this is carried out automatically and does not necessitate any manual activity or user participation.
It is ensured that Easy Recovery Essentials will auto-repair the “0x0000007b” fault by utilizing the built-in Automatic Repair feature. EasyRE is now compatible with Windows XP, Vista, 7, and 8, and it can be installed on any computer with an internet connection.
- When you install EasyRE, keep a note of your Windows operating system version (XP, Vista, 7, or 8). This tutorial can assist you in determining the operating system you have downloaded and installed.
- Start your computer by booting it from the Easy Recovery Essential items CD or USB drive that you generated.
- Once EasyRE is up and running, select the “Automated Repair” selection from the drop-down menu and click on the Continue.
- As soon as EasyRE has finished scanning all of your device’s drives, locate and pick any drive letter associated with your Windows system using the menu, and afterward hit on the Automated Repair option to start the recovery process.

Select the drive that corresponds to the Windows system that you’re going to repair.
- Easy Recovery Essentials will begin examining the targeted drive for potential errors and malfunctions. In addition, EasyRE will check for and begin to manually correct issues with the disk, partitions (including boot sectors), filesystems (including filesystems), bootloaders (including bootloaders), and registry. EasyRE’s repair is completely automated, thus there is no need for intervention.
Easy Recovery Essentials scans and corrects faults in the specified Windows installation by using a graphical user interface.
- EasyRE will provide a report on its results once the procedure has been completed. Hit on the Restart option to restart the computer and verify that the modifications have taken effect.
- Finally, when your computer starts to boot, the “0x0000007b” error should have been resolved:
Method 2: Check Drive For Malware
To determine whether or not your computer has been infected with such boot-sector malware, conduct an antivirus scan for identifying and eliminate all malware from your pc, which may help to resolve this error. Make use of any recent antivirus scanner that is up to date.
The Virus Scanner included in Easy Recovery Essentials can be used if you do not have an antivirus detector or are unable to reboot into Microsoft to perform a scan.
- First, you have to install the Easy Recovery Essentials on your pc. Then, you have to burn the image.
- Boot Easy Recovery Essentials is a program that allows you to boot up your computer quickly and easily.
- Now, you have to select the Virus Scanner

- Wait for the scanning process to be completed.

Method 3: Reboot Into the Last Known Good Configuration
Using the “Last Known Good Configuration” mode in Windows, you may be able to resolve certain problems raised by malfunctioning drivers as well as other corruptions.
This option compels your computer to use a previously saved edition of the registry, which may be incompatible with some systems.
The instructions are:
- Restart your device if necessary.
- Then when the Windows icon will appear, press and hold the F8 key periodically.
- Select Last Known Good Configuration(Advanced) from the Boot list of options on the next screen
- Finally, press the Enter

Method 4: Repair Corrupted System Items
Using the Windows default SFC (system file checker) program, it can easily inspect a computer’s file system and fix these if needed. This feature is available on both Windows 7.
The following are the procedures when running SFC:
- Start your computer by booting from your Windows installation DVD.
- After selecting the appropriate language, time, and then, keyboard input, pick Repair your computer from the drop-down menu.
- Choose the Windows installation drive, which is typically C: and click on the Next Once the System Recovery Selection box opens.
- Then, select Command Prompt from the drop-down menu. Type the commands below and press enter to complete the process:
sfc /scannow /offbootdir=D:\ /offwindir=D:\Windows\
In this case, D: will be replaced with the alphabet of that driver wherever Windows has been installed, and D: Windows with the location of the folder of Windows.

Method 5: Check the Disk Using CHKDSK Utility
If the file security of an HDD has been affected, it is necessary using the installed Windows CHKDSK software to check the disk & correct the file system problems that have occurred.
The following are the steps to perform a CHKDSK.
- Start by booting from the Windows installation DVD.
- After choosing the correct language, time, and key presses, select Repair your computer.
- Whenever the System Recovery Choices window appears, pick the Windows installation drive, which is generally C:, and hit Next. Once the Command Prompt box appears, type the following commands and press enter:
chkdsk C: /f
Substitute the letter C with the driver’s letter on which Windows is loaded.

Method 6: Replace NTLDR and NTDETECT.COM Files
Users of Windows XP can utilize their Windows Installation Disk to change the essential files enabling NTLDR to run properly. NTLDR and NTDETECT.COM are indeed the names of the files.
The following are the procedures to take for replacing these files:
- Place the Windows XP installation CD into the CD drive on your computer.
- Restart the computer and select the CD as the boot device.
- To start from the CD, tap any key on your keyboard.
- The Repair Panel can be accessed by pressing R once the Windows Settings menu has finished loading.
- Sign into Windows via pressing 1 and entering the Administrator password once completing this step.
- When copying both NTLDR and NTDETECT.COM items one by one from the Windows setup disk to the HDD, run the commands listed below on your command prompt.
- Now, copy the two following:
D:\i386\ntldr C:\
D:\i386\ntdetect.com C:\
Where D: represents the drive letter of the installation CD and C: represents the drive letter of the Windows XP drive.
- As soon as these files have been copied, the Windows installation disk should be removed from the CD-ROM drive.
- Finally, restart your computer.
Method 7: Recover the Registry Files
It is also possible to repair a damaged registry via replacing it with a fresh copy of the register that was produced on the HDD after Windows is loaded. This procedure will restore the computer to a configuration that may be considerably different from the current version; nevertheless, user data really should be recoverable in that condition. When any computer does have an OEM-installed os, this operation should never be performed since OEM installations establish passcode identities that didn’t initially exist in the system memory registry. Therefore, if these rules are followed on the OEM device, it is likely that it will not be available to keep logging into the restoration console in restoring the default registry hives.
First, a full backup of all existing system files is created in case something goes wrong. The previous registry is then destroyed, and a fresh copy from the C: WindowsRepair folder is installed in its stead.
- Windows XP Installation CD should now be inserted and restarted.
- The CD can be accessed by pressing any key
- The Repair Console is accessed by pressing R.
- The administrator’s password must be typed in here. The commands below should be entered one by one in the Command Prompt, exchanging C: with the drive letter of the Windows:
md tmp
copy c:\windows\system32\config\system c:\windows\tmp\system.bak
copy c:\windows\system32\config\software c:\windows\tmp\software.bak
copy c:\windows\system32\config\sam c:\windows\tmp\sam.bak
copy c:\windows\system32\config\security c:\windows\tmp\security.bak
copy c:\windows\system32\config\default c:\windows\tmp\default.bak

Creating a backup of the existing registry hives
delete c:\windows\system32\config\system
delete c:\windows\system32\config\software
delete c:\windows\system32\config\sam
delete c:\windows\system32\config\security
delete c:\windows\system32\config\default
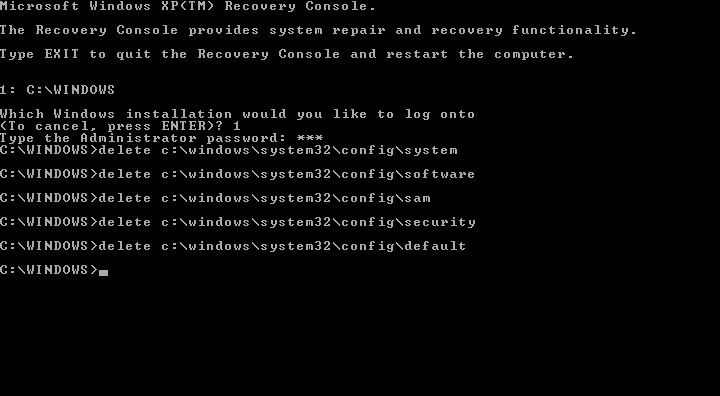
Deleting current registry hives
copy c:\windows\repair\system c:\windows\system32\config\system
copy c:\windows\repair\software c:\windows\system32\config\software
copy c:\windows\repair\sam c:\windows\system32\config\sam
copy c:\windows\repair\security c:\windows\system32\config\security
copy c:\windows\repair\default c:\windows\system32\config\default
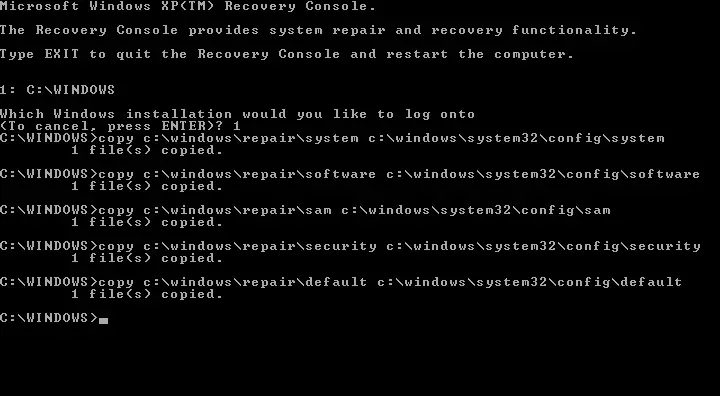
Using a repair folder, you can restore registry hives.
- Exit the program and discard your CD:
exit
- Tab on Enter
- Finally, restart your pc.
Anytime Windows boots properly, you can then either restore all user information and reboot Windows from start, or you can manually repair the system registry towards a more recent version by Operating System using steps provided in the Windows Knowledge Base article on the corrupt registry.
Method 8: Repair the EFI Bootloader
- First, you have to restart your pc and then, you have to boot your computer using the Windows DVD or USB.
- Now, you have to click on the Repair your computer, then select Troubleshoot.
- Next, you have to click on the Advanced Options, and then go to the Command Prompt
- Once you are there, you have to type the following commands and then have to press Enter after typing each:
diskpart
sel disk 0
list vol
- Scan the “Fs” section and look for the entry which has the string “FAT32” inside the “Fs” line. The EFI sector is configured under the FAT32 file system.
- If the value of the EFI entry is “1,” then you have to type the following command into the console:
sel vol 1
- Now you have to provide a character to the sector, a character which is distinct from any other letter of your pc (for example, y:),
assign letter=y:
- Enter exit to leave the utility software once the following message displays – DiskPart successfully assigned the drive letter or mount point
exit.
- Type the following command, but exchange the letter y: with the character of your preference:
cd /d y:\EFI\Microsoft\Boot\
- Type this following commands:
bootrec /fixboot
ren BCD BCD.backup
- To re-create this BCD, enter the following command. Keep in mind to replace y: if necessary:
bcdboot c:\Windows /l en-us /s y: /f ALL
- Discard the disk from the disk tray by typing quit and pressing Enter.
- Finally, you have to restart your PC.
Method 9: Other Fixes
When none of the solutions listed above work, consider any of the following suggestions:
- Remove any new hardware that you have recently set up and afterward restart the pc to see if you can get it back.
- Check to see that all external hardwires are correctly attached.
- If you have installed additional devices, try restarting your computer into Safe Mode and uninstalling that specific driver before rebooting your computer again. Check to see if the driver is appropriate for the Version of windows you are using.
Conclusion
There are some easy and effective methods are described above to fix the error 0xc00007b blue screen. You have to follow the steps properly and before applying these methods you have to check your operating system.
Subscribe to our newsletter
& plug into
the world of PC Hardwares

![[4 Fixes] Task Manager Power Usage Very High](https://www.hardwarecentric.com/wp-content/uploads/2023/08/Task-Manager-Power-Usage-Very-High.webp)

![[6 Fixes] 8GB Hardware Reserved RAM Windows 10](https://www.hardwarecentric.com/wp-content/uploads/2023/01/8GB-Hardware-Reserved-RAM-Windows-10.webp)
